Linux in a Pixel Shader - A RISC-V Emulator for VRChat
25 August 2021, by _pi_views
for comments see Hacker News, r/programming or r/vrchat
Intro
Sometimes you get hit with ideas for side-projects that sound absolutely plausible in your head. The idea grips you, your mind’s eye can practically visualize it already. And then reality strikes, and you realize how utterly insane this would be, and just how much work would need to go into it.
Usually these ideas appear, I enjoy dissecting them for a few days, and then I move on. But sometimes. Sometimes I decide to double down and get Linux running on my graphics card.
This is the story of how I made the rvc RISC-V emulator within VRChat, and a deep-dive into the unusual techniques required to do it.
Here are some specs up front, if you’re satisfied with piecing the story together yourself:
- the code is on GitHub
- emulated RISC-V
rv32ima/su+Zifencei+Zicsrinstruction set - 64 MiB of RAM minus CPU state is stored in a 2048x2048 pixel Integer-Format texture (128 bpp)
- Unity Custom Render Texture with buffer-swapping allows encoding/decoding state between frames
- a pixel shader is used for emulation since compute shaders and UAV are not supported in VRChat
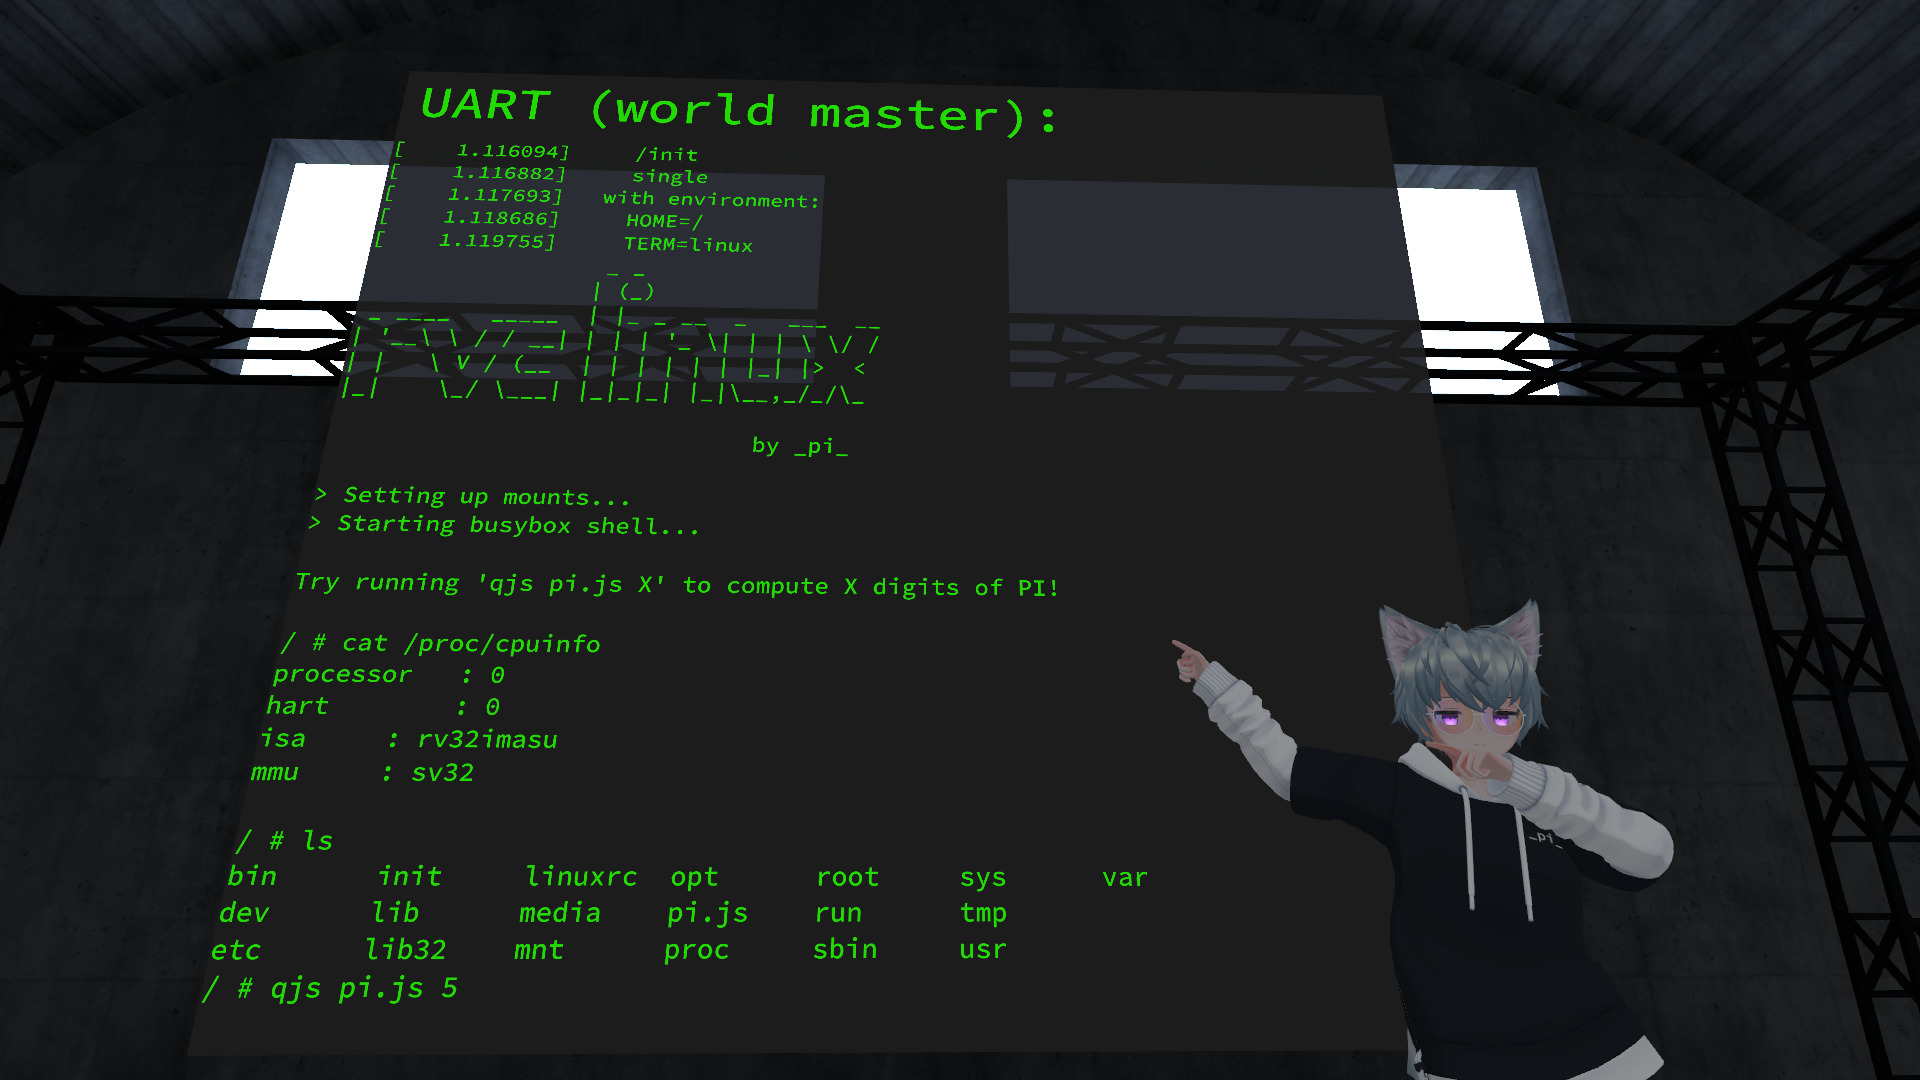 (image credit: @pema99, thanks!)
Be warned that this post might be a bit rambly at times, as I try to recall the many pitfalls of writing this shader. Let’s hope it will at least turn out entertaining.
About the project
Around March 2021 I decided on writing an emulator capable of running a full Linux Kernel in VRChat. Due to the inherent limitations of that platform, the tool of choice had to be a shader. And after a few months of work, I’m now proud to present the worlds first (as far as I know) RISC-V CPU/SoC emulator in an HLSL pixel shader, capable of running up to 250 kHz (on a 2080 Ti) and booting Linux 5.13.5 with MMU support.
You can experience the result of all this for yourself by visiting this VRChat world. You will require a VRChat account and the corresponding client, both of which are free and give you access to a massive social platform full of user-created content such as this (no VR headset required!).
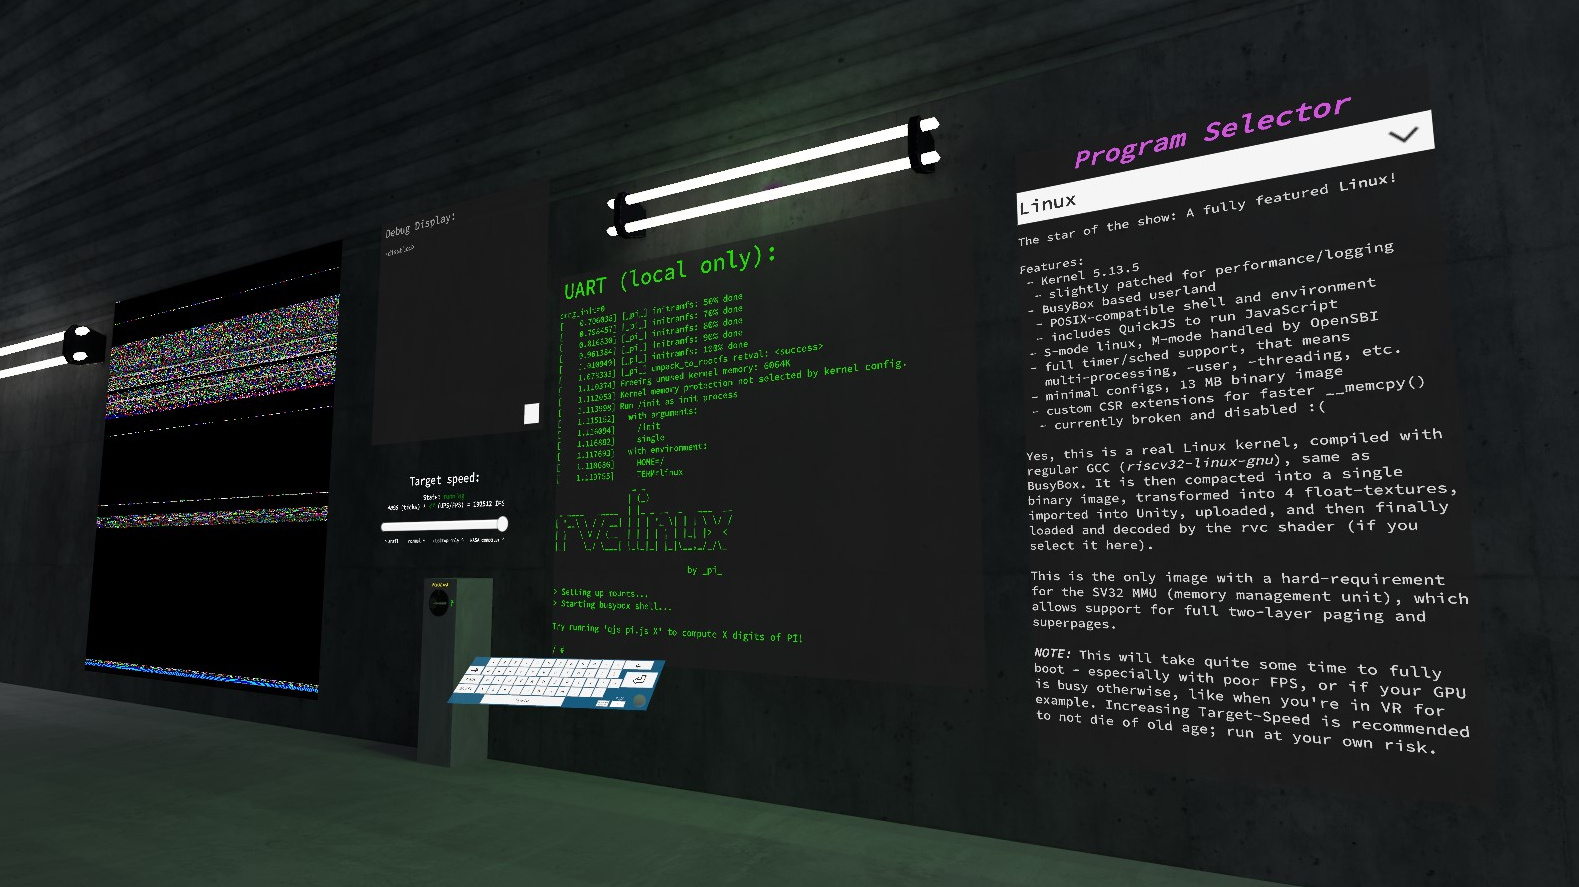 (a screenshot of the VRChat world and interface to use the emulator)
Here’s me in my Avatar again, standing in front of a kernel panic:
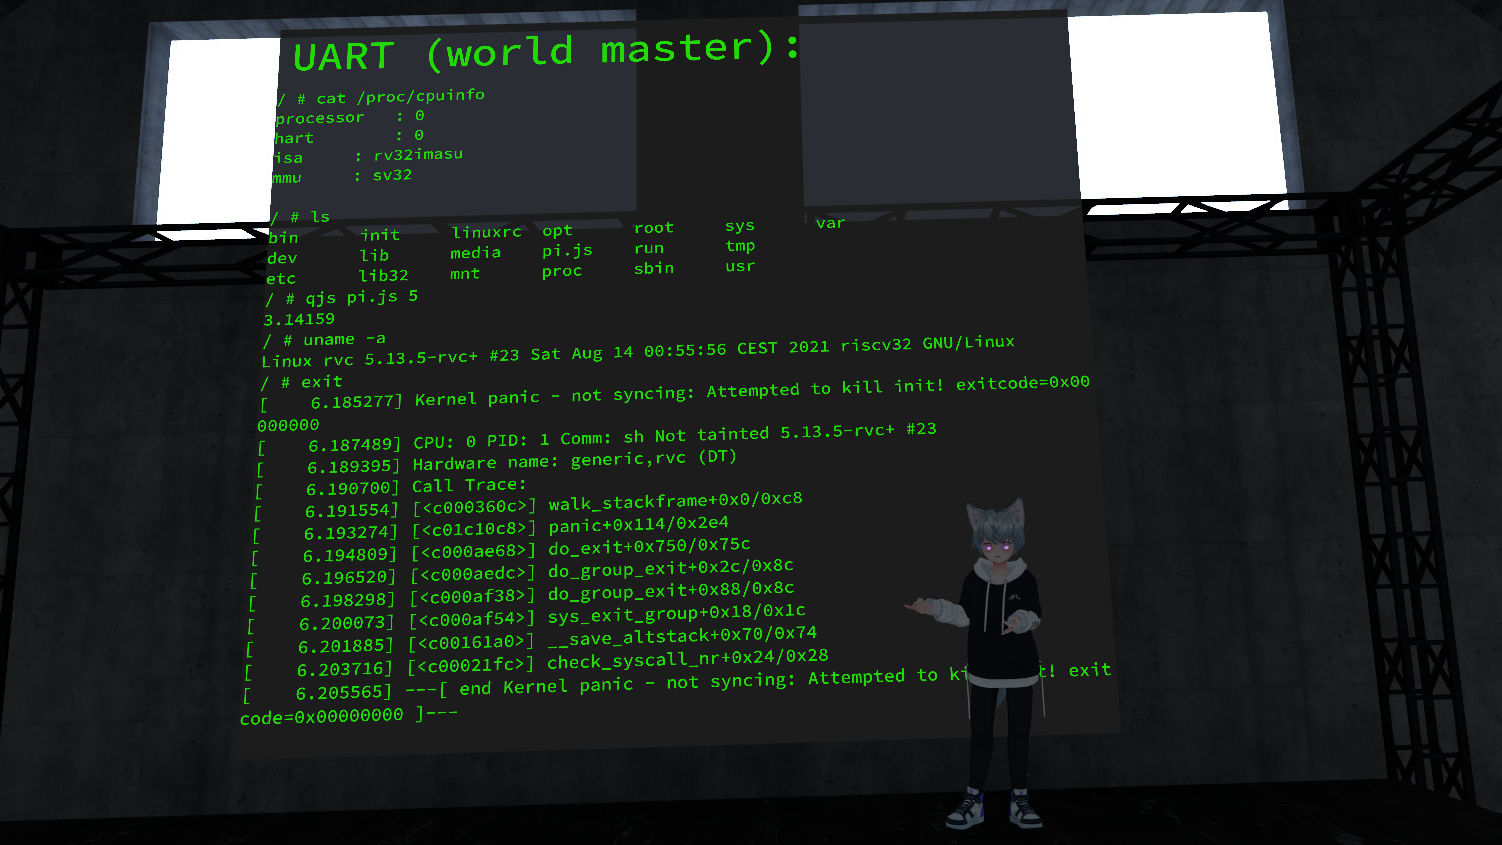 (image credit: @pema99 as well, I believe)
This picture was taken after I showed off my work at the community meetup, a self-organized weekly get-together of VRChat creators from all over. Here’s a recording of the live-stream where I presented it, it’s fun to see everyone’s reactions when I unveiled my big “secret project”:
Thanks to the team organizing the event for providing me with the opportunity!
The project has been featured on Adafruit, and my friend @fuopy over on twitter has posted video evidence as well:
Linux running in a shader! By _pi_! Check it out!!
— fuopy (@fuopy) August 15, 2021
(5x speed of Linux running in a fragment shader emulating RISC-V) World link:https://t.co/jYnR8AZrQM
#vrchat #shaders pic.twitter.com/gqW6qSXLb2
The response I’ve received in the days afterwards was tremendously positive. A seriously big thank you to everyone who asked for details, suggested improvements, shared the world, or simply shook their head in disbelieve towards me.
A Tribute to VRChat’s Creative Community
I am a big VR enthusiast - I was among the first to even try the original Vive here in Austria, and never looked back since. But it was only when a friend invited me into VRChat around August 2020, that I was introduced to the amazing creative-community surrounding that “game”/social platform.
I can’t speak for the visual side that much, though I dearly admire people who can summon 3D models and environments from scratch. Luckily, VRChat had recently released Udon, which allows world crafters to run custom code within their creations. This opened the door to the likes of myself, people who enjoy coding for fun and just want to push the envelope of what can be made.
Udon works super well for anything that doesn’t require high performance. The built-in visual programming combined with @MerlinVR’s UdonSharp (a C#-to-Udon compiler) are vital for making interactive worlds these days. People are using it to create incredible experiences, anything from multiplayer PvP games to petting zoos for ducks and dogs (and sometimes other players) - it is what got me interested in making content for VRChat in the first place.
 (image credit: u/1029chris)
What really sparked my imagination however, was the discovery that you can embed your own, custom shaders within such a world. You can even put them on your Avatars! With shaders, the sky is the limit - and if you take even just a cursory look at what the community has done in VRChat, you realize that even that is only a limit meant to be broken.
I like to compare it to demoscening. Instead of cramming stuff into limited storage space, you work around the limitations the platform imposes on you - there’s so many things you can’t do, that part of the challenge is to figure out what you can do. Or as resident shader magician @cnlohr put it:
I love how VRC programmers have a way of looking at [a] wall of restrictions, then find a way of switching their existence to a zero dimensional object for a moment, then they appear on the other side of that wall.

Pictured above is “Treehouse in the Shade”, one of the most famous shader worlds, with an unfortunately tragic backstory. It is indeed a beautiful world I have spent a good amount of time in myself.
One of its co-creators, SCRN, has also written some less visual, but more technical VRChat projects, like this deep learning shader.
Since discovering VRChat and the creator community, I have made several of my own custom Avatars and Worlds. Some are finished, some left as demonstrations of what could be.
And then, back in February or March of 2021, this little spark of an idea popped up in my head - if I could run anything I want in a VRChat world, then why not go for the end-goal straight away: Let’s run a Linux kernel!
Compute Shaders in VRChat
Udon, as mentioned above, comes fairly close to regular coding. It’s semantically equivalent to writing Unity behaviour scripts, and can utilize most of what C# has to offer using UdonSharp.
However, to quote from UdonSharp’s documentation:
Udon can take on the order of 200x to 1000x longer to run a piece of code than the equivalent in normal C# depending on what you’re doing. […] Just 40 iterations of something can often be enough to visibly impact frame rate on a decent computer.
With this performance constraint in mind, it becomes clear that CPU emulation is simply infeasible[0].
As far as I know there’s only two ways you can write custom code and have it execute in VRChat: Udon and shaders. This is important for security concerns of course, as Udon is a VM and shaders only run on the GPU. Since the former is out of the question, that leaves us with shaders.
But hold up, I hear you say, shaders are the little programs telling your GPU how to make things look good, right? How could you possibly emulate a CPU on that? And isn’t that kind of stupid?
Correct; By using compute shaders; And yes.
A “compute shader” doesn’t output an image, but simply data. It allows, in theory, to run highly parallel code on the GPU to compute any value. This is the principle behind CUDA, but is also used in games.
That sounds too easy though - and indeed it is, VRChat doesn’t allow you to use them in your creations. However, we can use some trickery here: By pointing Unity’s Camera object at a quad rendered with our shader[1], and then assigning the output RenderTexture (the target buffer) to an input of our shader, we have essentially created a writable persistent state storage - the basic building block for a compute operation. Any pixel we write during the fragment (aka pixel) shader stage, we will be able to read back next frame.
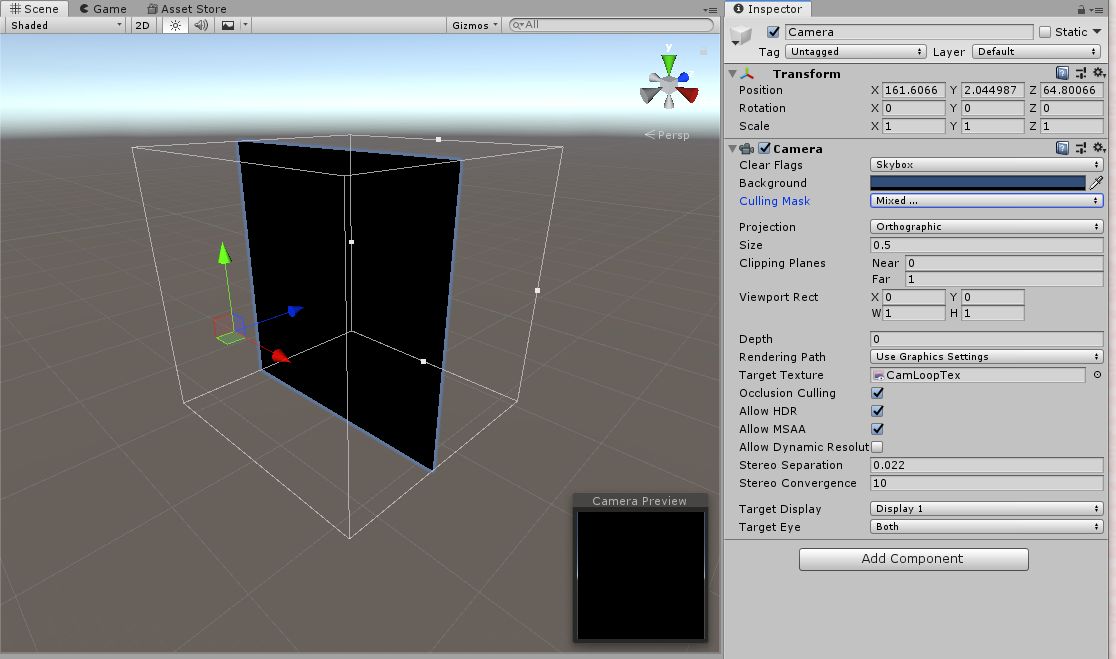 (image credit: @pema99 and their fantastic treasure trove of forbidden VRChat shader knowledge)
Of course there’s a bunch of texture alignment and Unity trickery necessary to make it work, but people have been using this technique for a long time, and it turns out to be surprisingly realiable. You can even use it on an Avatar, I managed to implement a basic calculator with it once.
The issue with that is of course that a fragment shader runs in parallel for every pixel on the texture, and every instance can only output to one of them in the end. We’ll see how to (mostly) work around that later.
[0] I feel the need to point out that someone did, in fact, emulate a full CHIP-8 in Udon alone, and someone else tried their hand at a 6502 - both projects run very slowly however, certainly too slow to get an OS booted… ⏎
[1] or in this case we’re using a Custom Render Texture, which is basically the same thing, but more cursed^Wcompact ⏎
Excursion: RISC-V
If you want to create a system capable of running Linux, you need to decide on which supported CPU architecture you want to emulate. Take a look into the kernel source, and you will see that there are quite a bunch available.
For our purposes, it is important that the ISA is as simple as possible, not just because I’m lazy, but also because shaders have both theoretical and practical limitations when it comes to program size and complexity.
I decided on RISC-V, mostly because I liked their mission in general - an open source CPU architecture is something to be fond of, and I had been following efforts to port Linux software to it with great interest. These days you can run a full Debian on some hardware RISC-V boards.
It of course helps that all the specifications for RISC-V are published freely on the internet, and there are good reference implementations available (shout out to takahirox/riscv-rust).

Writing an emulator in HLSL C
But back to making our emulator. First problem: Debugging a shader is hard. You can’t just attach GDB and single step, or even add printf statements throughout your code. There are shader debugging tools out there, but they mostly focus on the visual side of things, and aren’t that helpful when you’re trying to run what is basically linear code.
Luckily for us, HLSL, the language we use to write shaders in Unity, is remarkably similar to regular C. And so the first iteration of the emulator was written in C.
Of course, some prep-work to translating already went into it. If you were to show the code of the C version to any seasoned C programmer, they would shudder and call an exorcist[2].
#define UART_GET1(x) ((cpu->uart.rbr_thr_ier_iir >> SHIFT_##x) & 0xff)
#define UART_GET2(x) ((cpu->uart.lcr_mcr_lsr_scr >> SHIFT_##x) & 0xff)

#define UART_SET1(x, val) cpu->uart.rbr_thr_ier_iir = (cpu->uart.rbr_thr_ier_iir & ~(0xff << SHIFT_##x)) | (val << SHIFT_##x)
#define UART_SET2(x, val) cpu->uart.lcr_mcr_lsr_scr = (cpu->uart.lcr_mcr_lsr_scr & ~(0xff << SHIFT_##x)) | (val << SHIFT_##x)
(excerpt from the UART driver; packing logic for UART state since HLSL only has 32-bit variables)
After a few evenings spent coding, I got to a point where the riscv-tests suite passed for the integer base set (rv32i). The reason we’re going for 32-bit is because the version of DirectX that VRChat is based on only supports 32-bit integers on GPUs. In fact, at least historically speaking, even most GPU hardware has rather poor support for 64-bit integers.
I had figured out already that for Linux support I needed the ‘m’ (integer multiplication) and ‘a’ (atomics) extensions, as well as CSR and memory fencing support. Atomics are implemented as simple direct operations, as the system features only one hart (‘core’) anyway. CSRs are fully implemented, fencing is simply a no-op in C (in HLSL this becomes more important).
Multiplication is fully working in C, but not in HLSL - it requires the mulh family of instructions, which give you the upper 32-bit of a 32 by 32 multiplication. This would require a single 64-bit multiply, which is not available for our shader target, so I decided to emulate it using double-precision floating-point numbers for now. This is stupid.[3]
The C version remains fully functional even now, and new features will still be implemented there first. It’s just so much easier to debug, plus compile times are magnitudes faster. The first porting effort happened even before it was able to boot Linux, I then gradually added support for more and more stuff by ping-ponging between the C and HLSL versions.
[2] It is important to note that this quality has translated to HLSL too, I know for a fact that I gave some shader devs nightmares. ⏎
[3] Microsoft, please, I beg you, why would you add an instruction to DXIL but not implement it in HLSL?! ⏎
What’s better than a Preprocessor?
That’s right, two of them!
Now that we have a C version up and running, one of the first challenges for porting it to a shader is state encoding and decoding. To make it more obvious why this is important, here is what our fragment shader will look like in the end (simplified):
uint4 frag(v2f i) : SV_Target {
    decode();
    if (_Init) {
        cpu_init();
    } else {
        for (uint i = 0; i < _TicksPerFrame; i++) {
            cpu_tick();
        }
    }
    return encode();
}
The decode() logic takes care of intializing a global static cpu struct, cpu_init() or cpu_tick() update the state, and encode() writes it back.
This will run for every pixel in our state storage texture in parallel, and it’s the encoder’s job to pick which piece of information to write out in the end. Each pixel (that is, conceptually, every instance of this function running), can output 4 color values (R, G, B and Alpha) with 32 bits each, summing up to a total of 128 bit, or, more practically, 4 variables of our cpu struct.
What we need now is a mapping of pixel position and which state it contains. This must be consistent between encode and decode of course.
decode will consist of a bunch of statements akin to:
cpu.xreg1 = STATE_TEX[uint2(69, 0)].r;
…which will index the state texture at coordinates x=69,y=0, take the value stored in the red color channel and decode it as general purpose register (xreg) 1.
encode looks like this:
uint pos_id = pos.x | (pos.y << 16);
switch (pos_id) {
    // ...
    case 69:
        ret.r = cpu.xreg1;
        ret.g = cpu.xreg2;
        ret.b = cpu.xreg3;
        ret.a = cpu.xreg4;
        return ret;
    // ...
}
Yep, it’s just one massive switch/case statement. I can immediately hear people complain about performance here, since branching in shaders is generally a bad idea™. But in this case, the impact is minimal because of several reasons:
- This is a switch statement, not a pure branch, which can actually compile down to a jump table for the final shader assembly, meaning the cost of the branch itself is constant
- In accordance with the first reason, more branches are avoided by packing the x and y coordinates into the same value (this works since our state texture is small)
- While it is true that branches which resolve to different values for neighboring pixels cause divergence (i.e. they break parallelism), this happens at the very end of our fragment shader, everything prior should still execute in a combined wavefront
- If you’re concerned about this single switch/case statement, boy do I have bad news for you about the rest of this shader
My immediate thought when I decided on this approach was that these lines look very regular. It would be a shame to write them all by hand.
At first I figured I could come up with some C preprocessor macros (which thankfully are supported in HLSL) to do the job for me. However, it turns out such macros are really bad at anything procedural, like counting up indices - or coordinates. So instead, I decided on using a seperate, external preprocessor: perlpp.
In all honesty, this was probably a big mistake in terms of code readability. But it did work super well for this specific case, and with the full power of Perl 5 for code gen, I could do some neat stuff.
This is how a struct is now defined:
typedef struct {
    <? $s->("uint", "mmu.mode"); ?>
    <? $s->("uint", "mmu.ppn"); ?>
} mmu_state;
(excerpt from types.h.pp)
Ignoring the syntax highlighter completely freaking out (which happens in vim and VS code too, never got around to fixing that…), this looks fairly readable in my opinion. The $s perl function is defined to print a normal struct definition, but also store the name and type into a hash table. This can then later be used to auto-generate the encode and decode functions.
We also know the last address that contains any state, which we can use to place other, more linear data right after. In particular, this includes the CSR-area. CSRs are “Control and Status Registers”, which are 4096 32-bit registers that can be accessed using specific instructions (csrw, csrr, csrc, etc.). They contain certain state about the CPU’s environment, like the active privilege mode, IRQ enablement or the MMU base pointer (SATP).
Aside from a few exceptions, these do not have special semantics on read and write, so it is enough to store them in a way that they can be indexed using their address. 4096 values means 1024 pixels, which we place 4-word aligned right after the last state-containing pixel. Reading now simply means calculating the offset from the CSR base (which is determined by perlpp at compile-time) and doing a texture tap. Writing happens via a similar caching mechanism as main memory, more on that later.
In addition to all that, perlpp makes it possible to use loops in code-gen. This is tremendously helpful for dynamic sizing of caches and structs with many values (for example the 32 general purpose registers).
One of the many problems with shader code is that HLSL doesn’t support arrays in a meaningful way. Pointer math (and thus array indexing) just isn’t a thing on the GPU, so writing to a non-constant index of an array is impossible. To work around this, there are several places in the code with patterns like this:
typedef struct {
    <? for my $i (0..31) {
        $s->("uint", "xreg$i");
        print "\n    ";
    } ?>
    // ...
} cpu_t;

uint xreg(uint i) {
    #define C(x) case x: return cpu.xreg##x;
    if (i < 16) {
        [flatten]
        switch (i) {
            C(0) C(1) C(2) C(3)
            C(4) C(5) C(6) C(7)
            C(8) C(9) C(10) C(11)
            C(12) C(13) C(14) C(15)
        }
    } else {
        [flatten]
        switch (i) {
            C(16) C(17) C(18) C(19)
            C(20) C(21) C(22) C(23)
            C(24) C(25) C(26) C(27)
            C(28) C(29) C(30) C(31)
        }
    }
    return 0xdeadc0de;
    #undef C
}
(excerpt from types.h.pp)
This function returns the content of general purpose register i, but since the registers are not an array, it has to use a ([flatten]ed) switch statement. The outer if is an optimization, so each call only needs to go through 16 movc instructions. xreg is called a lot, and considered one of the “inlineable” functions - that’s why I’m not using a [forcecase]-style jumptable here; but we’re getting way ahead of ourselves…
Instruction Decoding and DXSC Bugs
Now that we can keep the state stored, let’s take a look at what our fragment shader will do with it. From the simplified example above, cpu_init is almost not worth talking about, simply zeroing the cpu struct and setting some default values. cpu_tick is where the magic happens, and our fairly normal, linear emulation code lives.
After reading an instruction from the current program counter (pc register) address, we need to decode it. I decided to cheat a little for this:
I took a look at how the aforementioned riscv-rust emulator handles that part, and quickly realized that the INSTRUCTIONS array in src/cpu.rs contains basically all information required for parsing. So I did what any sane person would, copied the entire array into a text file, wrote a little perl script and had it auto-generate the decoding logic for me.
The end result looks something like this:
// definition:
DEF(add, FormatR, { // rv32i
    NOT_IMPL
})
DEF(addi, FormatI, { // rv32i
    NOT_IMPL
})
// ... and many more

// decoding:
ins_masked = ins_word & 0xfe00707f;
[forcecase]
switch (ins_masked) {
    RUN(add, 0x00000033, ins_FormatR)
    RUN(and, 0x00007033, ins_FormatR)
    RUN(div, 0x02004033, ins_FormatR)
    // ...
}
ins_masked = ins_word & 0x0000707f;
[forcecase]
switch (ins_masked) {
    RUN(addi, 0x00000013, ins_FormatI)
    RUN(andi, 0x00007013, ins_FormatI)
    RUN(beq, 0x00000063, ins_FormatB)
    // ...
}
// etc.pp.
(actual definition is in emu.h)
This logic appears fairly optimal to me, in the end there are 9 different switch statements for slightly different opcode masks. I tried to sort these so that the most frequent instructions are first, though as I will discuss in the Inlining section below, this wasn’t always possible.
Observant readers (hi there!) will have noticed the [forcecase] above the switch keywords. This attribute is important for performance, as it forces the shader compiler to emit a jump table instead of a bunch of individual branches (or conditional moves with [flatten]). Now, you may be asking yourself, “if this is so important for performance, why isn’t it the default?”. Truth is, I have absolutely no idea.
Of course there are situations where it’s actually faster to [flatten], as conditional moves can lead to less divergence, but I don’t get why [branch], i.e. “make it a bunch of if-statements” exists.
Thing is, there doesn’t seem to be a limit for jump tables. I have a lot of them in this shader. However, if you look at the code in emu.h, you will see that some of the statements use an explicit [branch] - the explanation to this conundrum is as simple as it is dumb: If I put a [forcecase] there, it crashes the shader compiler.
I don’t know why, I never got any useful log output aside from a generic “IPC error”, and I haven’t heard of anyone else experiencing this - then again, how often do you write shader code in this style…
<rant>
The point I want to make in this section, is that the DirectX Shader Compiler can be very dumb and I hate it and it should go hide in a corner and be ashamed. No offense to anyone working on it, but I’ve had instances where a whitespace change made the difference between the shader compiler crashing and a working output.
Even if it is working, writing such a large shader is not a joy. I get that register allocation is a hard problem, but if gcc and clang can compile the same program in C within milliseconds, why do I have to wait upwards of 10 minutes for the HLSL version to compile?!
Remember when I said there was a good reason for keeping the C version around…
</rant>
Main Memory
To run Linux, I figured we’d need at least 32 MiB of main memory (RAM), but let’s be safe and make that 64 - the performance difference will not be big, and there should be enough VRAM.
At first, the main performance concern was clock speed. That is, how many CPU cycles can run in one frame. Initially, I went with what seemed to be the simplest option available - let’s call this version 1:
- 64 MiB of RAM require a 2048x2048 pixel texture at 128 bit per pixel
- let’s reserve a small area in the top-left, say 128x128 for our CPU state
- have the shader run one tick per execution and write the result out, treating RAM the same as state - i.e. we run the fragment shader for 2048x2048 = 4194304 pixels
This is obviously rather inefficient, and would ultimately result in a clock speed of 1 cycle per frame. We can somewhat tweak this by running the CRT (Custom Render Texture, or equivalent camera loop with Udon) multiple times per frame, but this incurs the hefty cost of double-buffering (and thus swapping) the entire 64 MiB texture every time. Instead, let’s leave this concept behind a bit and focus on version 2:
- same 2048x2048 texture with 128x128 state area as before
- shader split into two passes:
CPUTickdoes a CPU cycle but writes to a memory cache area within the 128x128 pixels, andCommitwrites that cache back to RAM - the Custom Render Texture is set up so it renders multiple times, first a bunch of
CPUTickpasses on just the 128x128 area, then it finishes up with a single full-textureCommit
This implementation already gets us a lot further. On the bright side, Unity is smart enough to realize that when you only update the 128 by 128 area, it also only needs to buffer swap this part of the texture. And since this area is fairly small, it fits entirely within the L2 cache of almost any modern GPU, making the swapping process very cheap. On the downside, this now means we need a seperate memory cache - no problem though, we have enough space left over in the state area to hold all the data we want.
Version 2 got up to around 35-40 kHz in-game, pretty decent, but still not fast enough for my liking. Enter the current version 3:
- same area splitting as before, keep the two-pass design
- instead of multiple passes in the CRT, simply loop directly in the shader and run multiple ticks at once
This option has the least non-compute overhead of all the above. There’s only two buffer swaps, and one of them is for the small area. This caching strategy (I call it the “L1 write cache”) is what makes this shader fast enough to run Linux. 300 kHz is not out of the question on a high-end GPU, my 2080 Ti regularly pushes over 200.
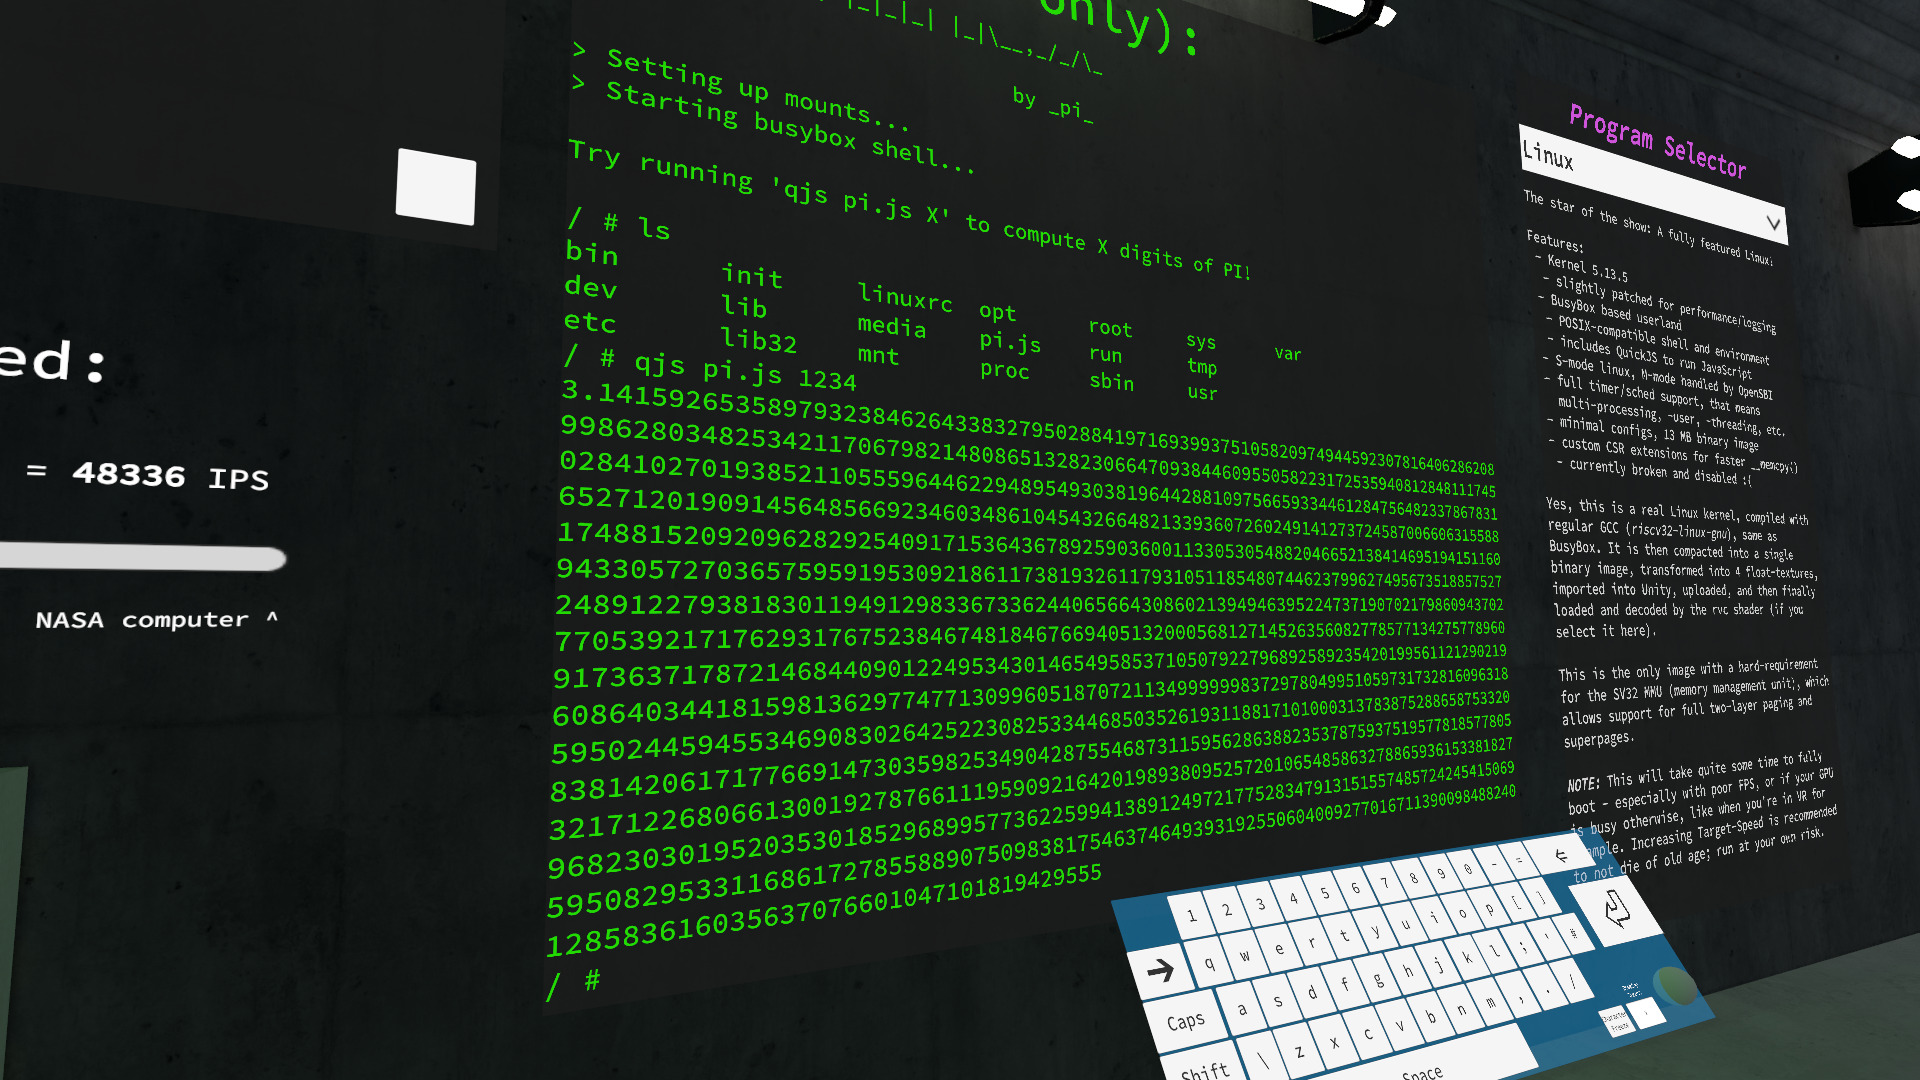 (image credit: @d4rkpl4y3r_vr, who had the patience to show that the emulator can calculate pi to 1234 places)
However, there is now a glaring issue: If we run multiple ticks per iteration, we cannot use the 128x128 px state area as a cache anymore. In a fragment shader, we can only write output at the end of execution, but memory writes can happen anytime during emulation, and must be architecturally visible immediately - that is, in RISC-V, a write followed by a read to the same address must always return the previously written value.[4]
With this in mind, the L1 cache only has one place to live: The GPU’s register file. I’ve been told modern architectures should support up to 64 kB of instance state (I suppose it can evict to VRAM?), but in practice the limit you’re going to hit is once again the shader compiler. Use too many variables, and we’re back at waiting 15 minutes for an “IPC error”.
At the time of writing, L1 is a two-way set associative cache with 16 sets and 5 words per line[5]. This comes out to 320 bytes per frame - with the current setup, a good GPU can push up to 4000 instructions per frame, and with sw (“store word”) being one of them, this cache will fill up in as little as 80. If the cache is full, the CPU stalls until the next Commit. A little trick is to double up the Commit passes and do two CPUTicks as well - that way we can at least get twice the throughput, while only incuring a moderate performance hit for buffer swapping the full 64 MiB twice.
This caching strategy is the tradeoff I made for clock speed - memory write performance absolutely sucks. But it’s decidedly faster than limiting the clockspeed itself, the “real-world” performance is certainly better this way.
A neat little side-effect of storing main memory in a texture, is that you can display it visually! Below is a (jpeg-compressed and downsized) picture of the main memory with a fully booted linux kernel.
Notice the two large zeroed (black) areas at the top (128px state area + OpenSBI and reserved bootloader memory), and the fascinating blue memory pattern at the bottom (that’s the high addresses, I believe the regular stripes are due to early memory poisoning of the SLAB/SLUB allocator in the kernel, feel free to correct me on this):

The texture is also on display in the VRChat world, where you can take a closer look during execution yourself. It’s quite fun to see memory framention visibly become worse, the more userspace programs are started.
As an aside, you might be wondering why I called the cache “L1”, as in “Layer 1”. The reason is that in the future I’m planning on extending this concept to become a sort of hybrid between version 2 and 3. The idea is that there will be multiple ticks before a commit, each one being followed by a Writeback pass, that still only operates on the 128x128 texture (for cheap double-buffering) and flushes the L1 cache to a page-based L2 variant.
The tricky part here is that this has to go away from being set- or fully-associated, as both of these variants would not only incur massive performance penalties for lots of branching, but also for the repeated texture taps (as I can’t allocate any more registers for the L2 without crashing the compiler again). Instead, I’m planning on having only a few registers allocated that contain page base addresses that then point to a linear cache area in the state texture. This is somewhat hard to keep coherent though, and requires a new concept of stalling only until a Writeback, so I couldn’t get it done in time for the initial presentation.
[4] an exception to this rule is instruction loading, which only needs to be consistent after a fencei instruction - we can make use of this by omitting the somewhat expensive cache-load logic for memory reads and just tap the texture directly, simply stalling the CPU on fencei until the next Commit since it is called very infrequently ⏎
[5] another benefit of perlpp: all of these values are configurable in a single “header” file ⏎
A Note on Inlining
HLSL has the peculiarity that there are no function calls. All functions are inlined at the call site[6], if you call a function four times, it will be included four times in the output assembly. This is of course recursive, so a function that calls other functions will also inline those at every callsite.
This doesn’t sound like a big issue, but it turns out it actually is - one of the biggest performance tricks I learned during development of the emulator, is that avoiding multiple callsites can improve performance quite a bit. I’m not 100% sure why that is, but I would assume it has to with locality/recency in the L1i cache of the GPU. So less code = less assembly = less thrashing in the instruction cache, and thus better performance.
Additionally, how could it be any different, it also helps with actually getting the thing to compile. More inlines means more code to translate, and the shader compiler really hates code.
This gives rise to some awkward optimizations, that would produce the opposite result almost anywhere else. The main example of this is coalescing memory reads and writes:
The C code simply calls mem_get_word in the execution path of each instruction. This works, because the function call is cheap. But if it were to be inlined in every instruction that reads from memory, it would slow down the shader a lot. Instead, we do it preventatively - before even executing the instruction-specific code, check by way of the opcode if the instruction might need to read a value from memory. If that is the case, figure out where from (which is different for regular lX and atomic ops), and load the memory once. This way, mem_get_word only needs to be inlined once for the entire instruction emulation path.
We also handle unaligned memory reads creatively. Off the top of my head, this would be the obvious solution:
off = (read_addr & 3) * 8;
val = mem_get_word(read_addr & (~3)) >> off;
val |= mem_get_word(read_addr & (~3) + 4) << (32 - off);
…but instead, we use the one tool HLSL gives us to avoid multiple inlining, loops with the [loop] attribute that prevents them from being unrolled:
uint w1 = 0, w2 = 0;
[loop]
for (uint ui = 0; ui < ((read_addr & 0x3) ? 2 : 1); ui++) {
    uint tmp = mem_get_word((read_addr & (~0x3)) + 0x4 * ui);
    [flatten]
    if (ui) { w2 = tmp; }
    else { w1 = tmp; }
}
val = w1 >> ((do_mem_read & 0x3) * 8);
val |= w2 << ((4 - (do_mem_read & 0x3)) * 8);
There are several places in the code that seemingly make no sense, but are actually intentionally written with the goal of avoiding inlining. Try to keep that in mind, if you dare read through the source yourself.
[6] there is a [call] attribute for switch/case, but once again I don’t know why you wouldn’t just use [forcecase], in my testing it unconditionally made performance worse - it does however actually compile to a jump and return, meaning the capability must exist in shader assembly, but even functions with [noinline] (which is a valid attribute) are always inlined… ⏎
Excursion: Debug View
For debugging purposes, and later on also actual data extraction, we need a way to communicate values from our shader to the user. And ideally not just the enduser, but also Udon, where we can further process the data on the CPU. Udon does not expose Graphics.Blit, which is the usual Unity way of reading shader output to the CPU, so we need some trickery again.
The only way currently to get pixel data from a shader into Udon is via the OnPostRender callback. If the behaviour is on a Camera object, this will be called once per frame. Within it, Buffer.ReadPixels can be used to retrieve the actual pixel data into a Read/Write enabled static Texture2D object. The individual pixels can then be accessed as Color structs. But not so fast, a Unity Color contains four float values at 8-bit precision, and alpha is premultiplied - so simply reading our state/RAM texture which uses Integer-Format with 128 bpp is out of the question.
Instead, we write a secondary shader, a “helper” shader if you so will, that stretches the state texture (and only the state part, not the entire RAM) onto a seperate, floating-point enabled texture 6-times the width (and only using the 3 base color channels). Doing some “clever” floating-point math and bit-twiddling allows us to finally recover the original value.
#define PACK_MASK 0xFF
#define PACK_SHIFT 8
void pack_uint4(in uint4 data, out float3 result[6]) {
    result[0] = (data.rgb & PACK_MASK) / 255.0f;
    result[1] = ((data.rgb >> PACK_SHIFT) & PACK_MASK) / 255.0f;
    result[2] = ((data.rgb >> (PACK_SHIFT*2)) & PACK_MASK) / 255.0f;
    result[3] = ((data.rgb >> (PACK_SHIFT*3)) & PACK_MASK) / 255.0f;
    result[4].r = (data.a & PACK_MASK) / 255.0f;
    result[4].g = ((data.a >> PACK_SHIFT) & PACK_MASK) / 255.0f;
    result[4].b = ((data.a >> (PACK_SHIFT*2)) & PACK_MASK) / 255.0f;
    result[5].r = ((data.a >> (PACK_SHIFT*3)) & PACK_MASK) / 255.0f;
    result[5].gb = 0;
}
#undef PACK_SHIFT
#undef PACK_MASK
(excerpt from helpers.cginc, for encoding)
private const float MULT = 255.0f;
private const float ADD = 0.5f;
private uint decodePackedData(int x, int y, int c)
{
    Color[] col = new Color[6] {
        Buffer.GetPixel(x, y),
        Buffer.GetPixel(x + 128, y),
        Buffer.GetPixel(x + 128*2, y),
        Buffer.GetPixel(x + 128*3, y),
        Buffer.GetPixel(x + 128*4, y),
        Buffer.GetPixel(x + 128*5, y)
    };

    switch (c) {
        case 0:
            return (
                (uint)(col[0].r * MULT + ADD) |
                ((uint)(col[1].r * MULT + ADD) << 8) |
                ((uint)(col[2].r * MULT + ADD) << 16) |
                ((uint)(col[3].r * MULT + ADD) << 24)
            );
        // ...
    }
}
(excerpt from NixDebug.cs, for decoding - this file is in desperate need of a cleanup :/)
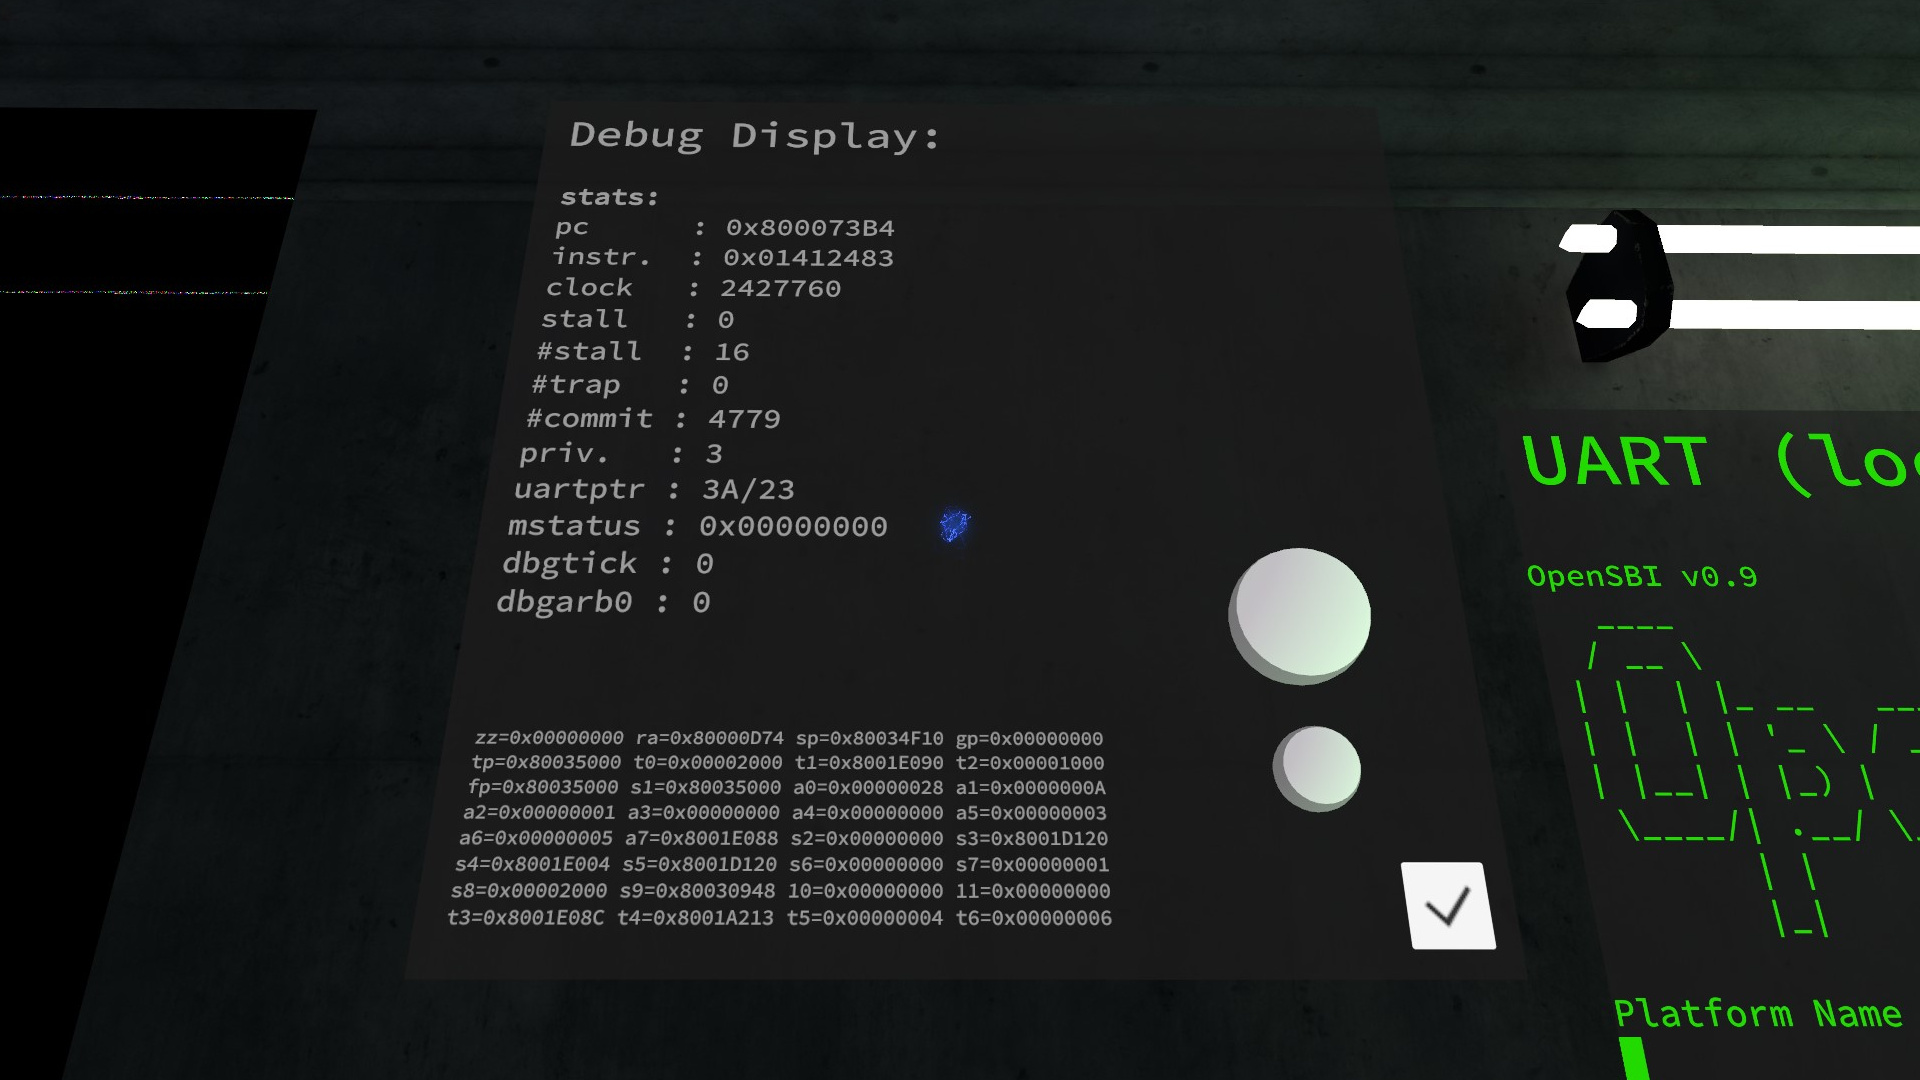 (the debug display as seen in-game, the spherical buttons allow for single-stepping)
This is fairly expensive, especially since it’s running in Udon, so we limit the rendering of this Camera to once every 15 frames or so. Certainly not pretty, but works well enough for debugging (and unfortunately also some device state).
MMU and Devices
The emulator includes a full SV32 memory management unit. I didn’t even plan on adding this at first, but it turns out Linux only supports NOMMU mode on 64-bit RISC-V. I suppose this project is a fairly niche use-case…
Fortunately, this ended up being easier than expected. I’m not sure what it was about the MMU, but it sounded quite difficult at first, only to turn out to be a straightforward implementation of the paging algorithm described in the RISC-V privileged spec.
Once again, the two-layer pagewalk is performed with avoiding inlining in mind. The load_page function only has one callsite, with the recursive walk taken care of by a loop. I felt that the MMU logic was optimized enough that I could get away with using mem_get_cached_or_tex, which includes the cache logic - this means that page tables are fully coherent, and sfence.vma (what would be a TLB flush on x86) can be a no-op.
There are two devices on the emulated SoC that can issue interrupts - the CLINT timer and the UART. Additionally, software interrupts into both machine and supervisor mode are supported as well. All of this is covered under the umbrella term “trap handling”, which deals with IRQs and exceptions. Most of this logic is borrowed fairly directly from riscv-rust again, with the exception being that PLIC and CLINT are handled all at once.[7]
The timer’s frequency is in sync with the CPU clock, i.e. one clock cycle equals one timer tick. That being said, this is not what our device tree is communicating to Linux. The frequency given as timebase-frequency = <0x1000000>; ranges in the MHz, obviously way faster than what it actually runs at. I’m not entirely certain why that is necessary, but if I set this to a more natural 200 kHz-ish, Linux schedules it’s own timer interrupt so frequently as to completely stall the boot process.
The UART is a bit more tricky: While the emulator-facing side is a fairly simple 8250/16550a serial port, it also needs to communicate data out to the user and read inputs.
Output is currently handled via a ring-buffer that is shared with Udon using the same mechanism as the Debug View mentioned above. Udon then simply puts the characters to a Unity UI Canvas. I plan on replacing this with a fully shader-based terminal renderer in the future, this would also allow me to properly implement ANSI/VT100 escape codes - vim vs emacs live debate in VRChat anyone?
 (a bug in the UART output causing me to boot the knockoff “ninux” built with “GNU Bnnutils”)
Input is rather simple too, using a regular shader parameter to pass the input ASCII character from Udon (specifically a modified version of @FairlySadPanda’s Keyboard script) to the shader. It also needs the Debug View mechanism however, since the guest running in the emulator might not acknowledge the received character, in which case it will remain in the buffer and RBR will stay set. This of course also limits input speed to how often we decide to render the performance-hungry debug Camera.
There is currently no disk emulated, since VRChat doesn’t support world persistancy at the moment anyway. Linux boots entirely from RAM, the initramfs stays mounted as the rootfs.
[7] Side-note that I mention for no particular reason and definitely didn’t spend a full day tracking down a related bug on: Did you know that bitwise negate in Rust is !, which, if copied to C, will compile successfully and without warning, but actually perform a boolean negate? Now you do! ~ is what you need, obviously. ⏎
Payloads
Speaking of the initramfs, compiling software to run on the emulator is suprisingly straightforward. I used Buildroot to generate a riscv32 GNU toolchain for cross-compiling on my host, and also to generate a cpio image containing BusyBox, QuickJS and my little init script to print a neat ASCII art logo.
The kernel itself is version 5.13.5, which was the latest stable before the presentation. It runs completely stock with an allnoconfig and only configuring what’s absolutely necessary, but I did patch in a few tweaks. At the moment, these consist of:
- Not poisoning boot memory, as that takes too long and is mostly for security (which, as you might have guessed, does not have the highest priority in this project)
- Printing more information during initramfs loading (as otherwise it just looks like it got stuck for a while; did I mention memory write/copy is really slow?)
- Currently disabled, but for future use a paravirtualized
memcpyimplementation, that uses custom CSR registers to copy memory in theCommitstage instead of going through L1 cache
I have a prototype of the last point working now, but before the presentation some last-minute bugs prevented me from showing it off.
Of course, Linux is not the only thing that runs on the emulator. The GitHub has some instructions on how to build other payloads. Aside from a very basic bare-metal C program to test functionality, the two more interesting ones are Micropython and Rust-Test.
The first one, Micropython, provides a Python 3 REPL where you can experiment with writing your own code live in VRChat. The benefit of it being that it boots way quicker than Linux. I had to add a riscv32 port myself, based on the existing riscv64 version, it certainly isn’t the cleanest but it boots and does what it’s supposed to showcase.
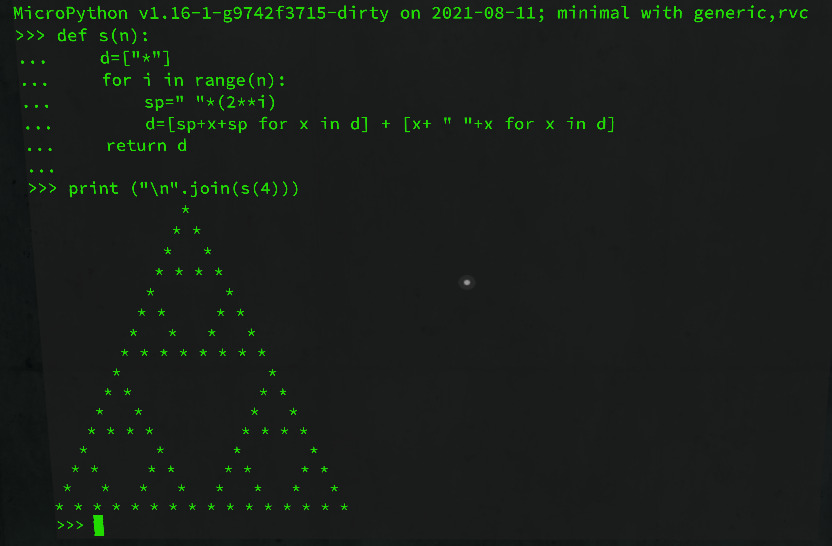 (image credit: @pema99, a sierpiński triangle rendered with Micropython)
The Rust-Test or rust_payload program is my experiment in building native, no-std Rust for use on the emulator. I needed to patch the rustc compiler to not emit compressed instructions (which are not implemented, as decoding them would only take more assembly-space and RAM is actually the one resource we have more than enough of). This was among the first things to run successfully on the emulator!
This one gave me some interesting ideas for potential future use-cases as well. Imagine having an interface to call Unity functions from the emulator (e.g. via the previously mentioned debug interface), and then writing your world scripts in Rust. Probably too slow to be useful, but an intriguing concept.
And just to have it noted, all payloads (aside from the bare-metal test) run on top of OpenSBI, which, if you’re coming from x86 you can think of as sort of a “BIOS” or “firmware”. It runs in machine mode, handles basic initialization tasks and prepares the environment for the stage-2 payload. It also provides some functionality to the next stage running in supervisor mode, most importantly timer scheduling (which requires machine privileges) and a basic UART driver (really useful in the Rust-Demo, as we can print to the console easily using it).
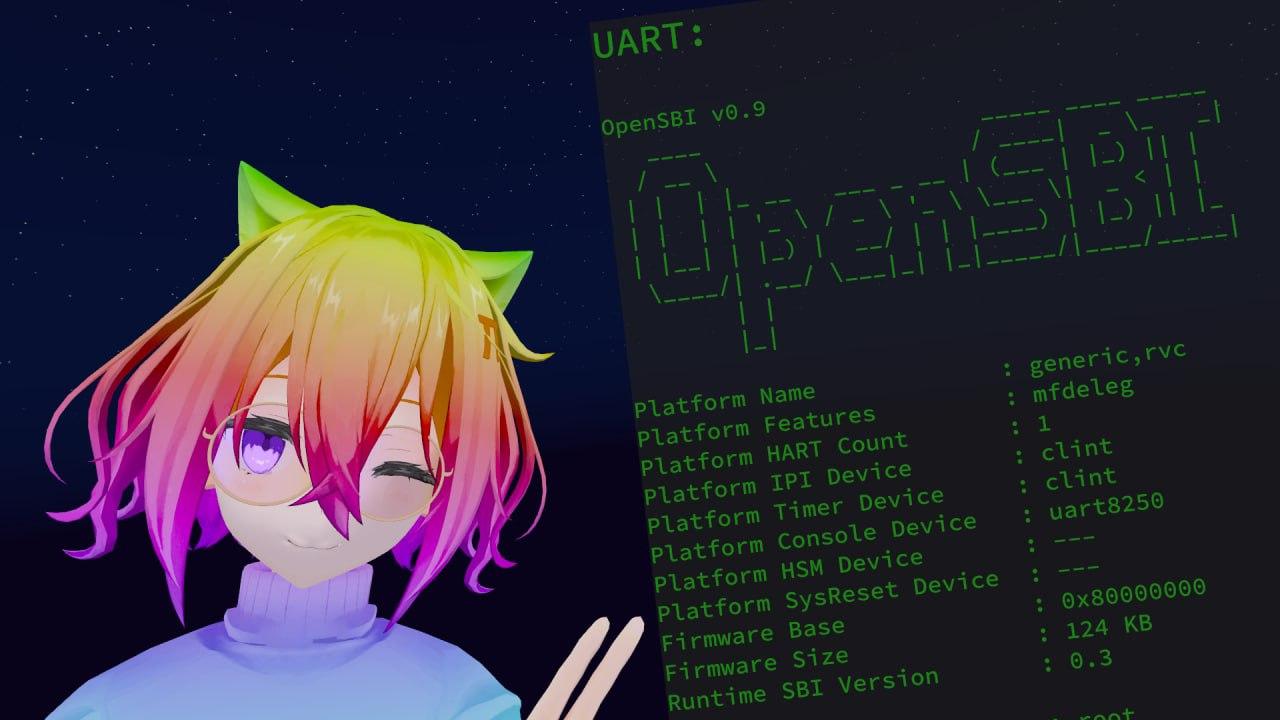 (me standing in front of OpenSBI in VR for the first time)
The End?
This was a big project for me, spanning over several months and bringing together many areas of knowledge I had aquired so far.
During development, I kept this project a secret for the longest time - I just love the thrill and payoff that comes with presenting something that absolutely nobody expected to see. Making this in VRChat has not only provided an additional challenge to overcome, but also brought with it the potential of demonstrating this live, in front of an audience, and then continue to chat with talented creators from all over. I thank everyone that answered my sometimes cryptic requests on Discord and in VRChat itself, and also everyone that didn’t ask what I was even working on when I frustratedly vented about something (probably the shader compiler) again.
This project has given me the opportunity to learn about the inner workings of RISC-V, it taught me more about the Linux Kernel’s boot process and hardware interface than most people would want to know, and it gave me an excuse to dive deeper and deeper into the magical world of shaders.
Once again, feel free to read the full code on GitHub, or check out the world for yourself in VRChat - I’m always happy to chat in person, if you manage to catch me there :)
I’ll probably continue working on this project for a while, I still have a bunch of ideas at the ready. Maybe, just maybe, I’ll even write more blog posts about it.
So until next time,
~ _pi_